
Don't let a slow leak sink your plans for a great day on the water. The first step in any successful inflatable boat repair isn't grabbing the glue; it's a proper diagnosis. It all starts with knowing exactly what your boat is made of—either PVC or Hypalon—because that one detail dictates the entire repair process.
Once you know your material, you can confidently find the leak and grab the right supplies for a fix that will actually last.
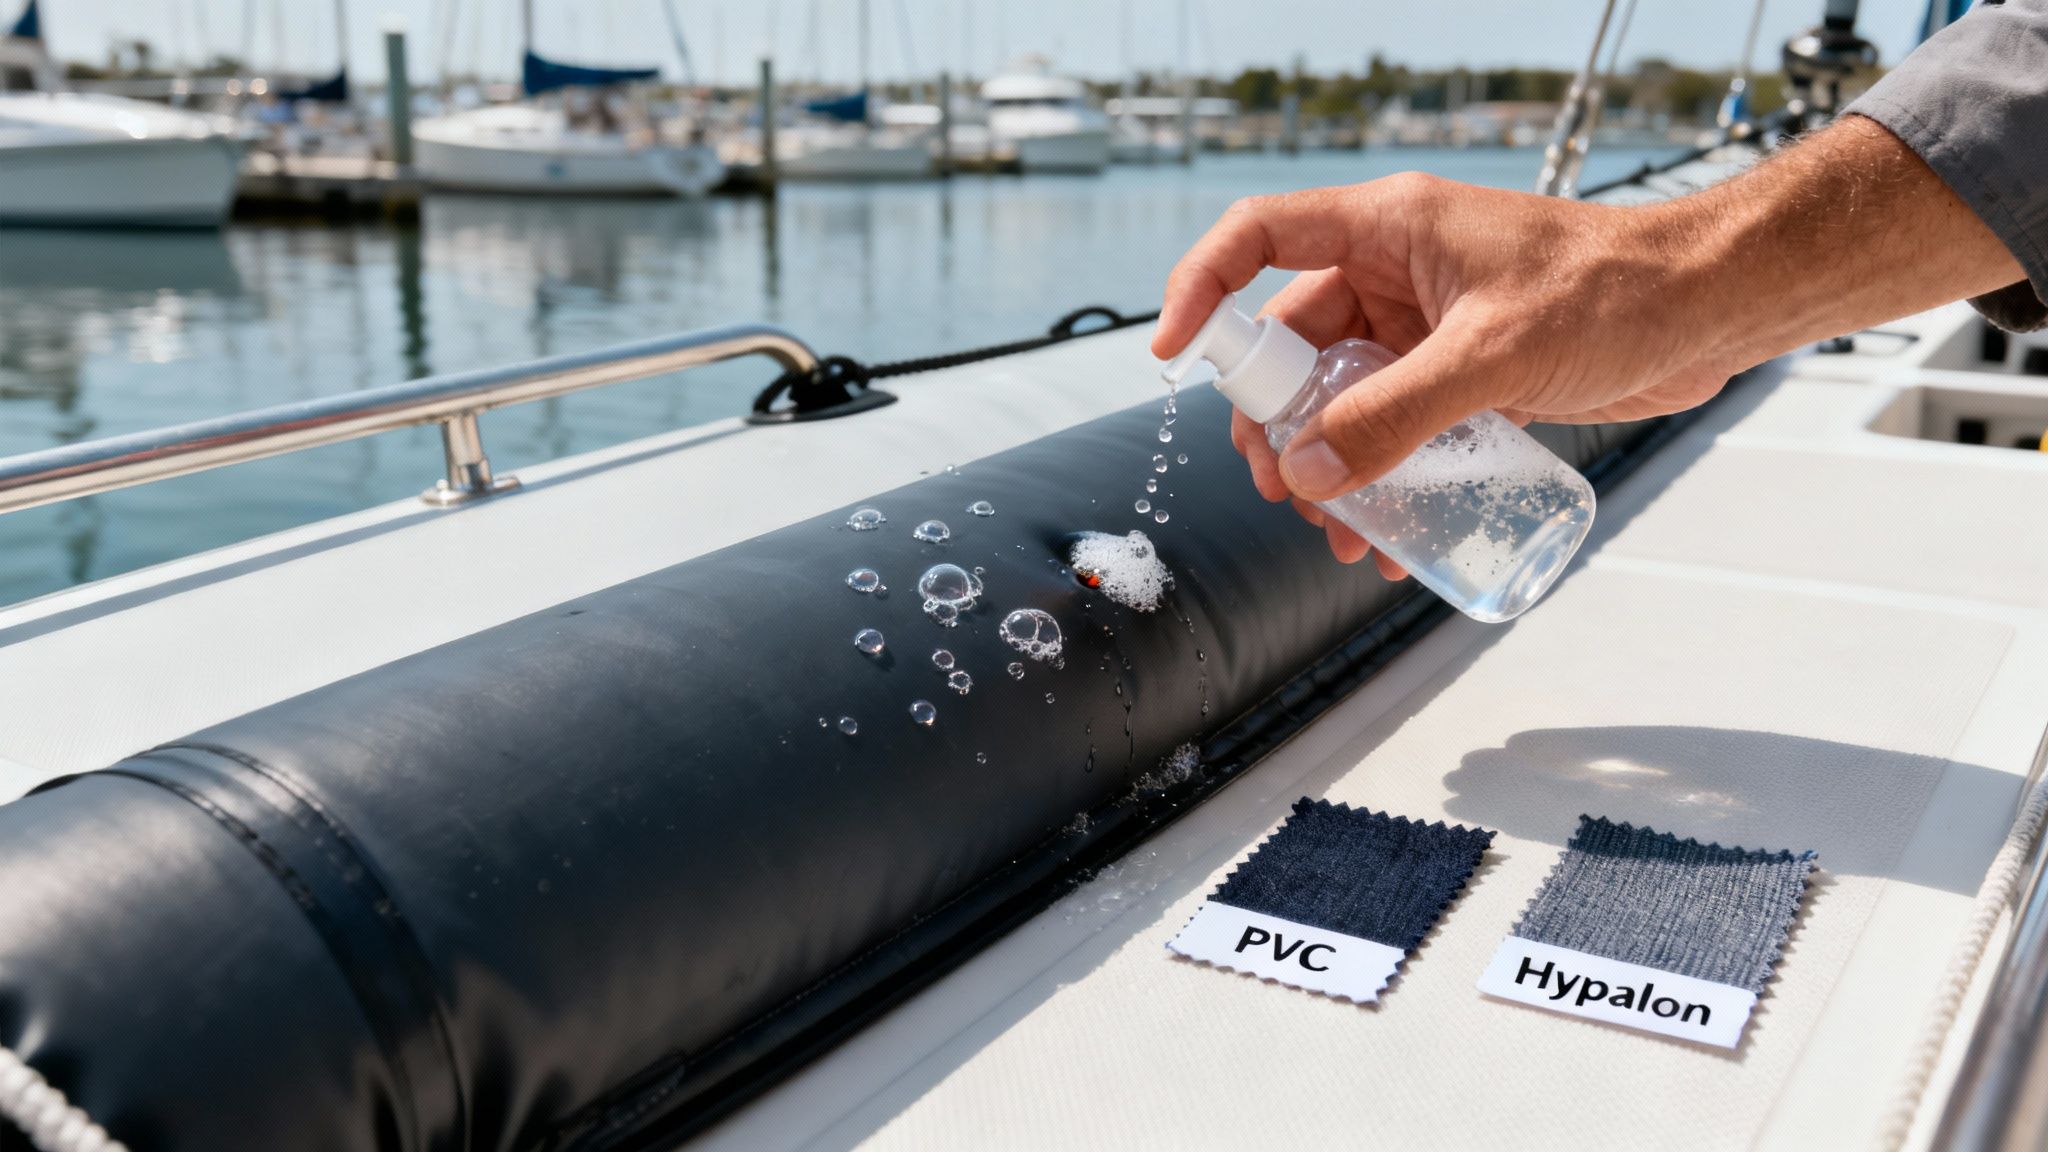
Before you even think about patching a hole, you have to be certain about your boat's material. The number one reason DIY repairs fail is using the wrong adhesive. A PVC boat demands a specific polyurethane-based glue, while a Hypalon boat needs a two-part chloroprene adhesive. They are absolutely not interchangeable.
If you can't find your boat's manual, there’s a simple test you can do. Find a hidden spot on the boat, like under a seat patch or on the inside of a tube, and wipe it with a cloth dabbed in a little MEK (methyl ethyl ketone). If the surface gets sticky and tacky, you’ve got a PVC boat. If the MEK just dulls the finish a bit and evaporates without making it sticky, it's Hypalon.
With the material identified, it's time to play detective and hunt down that leak. The most reliable method is still the classic soapy water test. Just mix a good squirt of dish soap with water in a spray bottle—the bubblier, the better.
Inflate your boat to its normal operating pressure, then start spraying it down one section at a time. Be extra thorough around these common problem areas:
When you spray a leaky spot, you’ll see a cluster of tiny, tell-tale bubbles forming. That's your target.
A quick tip from the field: mark the spot immediately with a waterproof marker or a piece of tape. It’s surprisingly easy to lose track of a tiny pinhole once you wipe the soap away.
Sometimes, the issue is with the valve, not the boat's fabric. If you see bubbles coming right from the centre of the valve, the internal core might just be loose or worn out. Often, a simple tighten with a valve wrench is all it needs. If that doesn't work, it might be time to look at some new inflatable boat valves. This simple check can save you from a completely unnecessary patching job.
While a small puncture is the most obvious reason for a repair, a lot of the persistent, slow leaks that drive boat owners crazy come from more subtle issues. Learning to spot these early can save you a world of frustration down the track.
Often, the problem starts as a barely noticeable loss of pressure overnight, something you might just write off as normal. But left unchecked, it can turn into a serious issue.
Failing seams are a classic culprit. Instead of a distinct hiss you can hear, a seam leak is usually a frustratingly slow deflation over several hours or even days. These are a nightmare to find with the usual soapy water test because the air escapes along a thin line, not from a single point, creating tiny bubbles that are incredibly easy to miss.
Another common weak point is the valve. Over time, the valve core—the small spring-loaded mechanism inside the housing—can wear out or get clogged with sand and grit, stopping it from creating a perfect seal.
Before you start hunting for a hole in the fabric, grab your soapy water and give the valve a thorough spray. If you see bubbles forming from the centre pin, your problem might be a simple fix like tightening the core or replacing it, not a full-blown patching job.
Old patches are also notorious for causing trouble. A repair done years ago might start peeling at the edges, especially if the surface wasn't prepped properly the first time around. Improper prep is the number one reason repairs fail on the first trip back on the water. This usually happens because the surface wasn't scuffed enough or was still contaminated with dirt or old glue.
A critical mistake is using the wrong adhesive for your boat's material. As any Australian specialist supplier will tell you, a huge number of repair failures happen when someone uses PVC glue on a Hypalon boat, or the other way around. The glues are chemically incompatible, meaning the patch is guaranteed to fail, often when it's under stress from the heat and pressure out on the water.
In fact, seam and valve issues are so common they make up around 70% of all repairs.
It’s vital to know when you're dealing with a simple fix versus a serious structural problem. Mismatched materials are a major red flag. For a deeper understanding of the differences, our guide on Hypalon vs German Mehler PVC is a must-read. Using the wrong glue or patch material guarantees failure.
Remember, a proper inflatable boat repair relies on a chemical bond between compatible materials. An incorrect adhesive creates a weak, temporary seal that will break down, potentially leaving you in a dangerous situation on the water.
To help you figure out what you're up against, here's a quick checklist for diagnosing the problem.
Use this table as a quick-reference guide to identify what might be wrong with your boat and decide if it's a job you can tackle yourself.
| Symptom | Likely Cause | Recommended Action |
|---|---|---|
| Persistent slow leak, hard to find | Failing seam or worn valve | Test the valve thoroughly first, then meticulously inspect all seams. Seam repairs can be tricky for beginners. |
| Bubbles from the centre of a valve | Loose or faulty valve core | Try tightening it with a valve wrench. If the leak persists, replace the entire valve assembly. |
| An old patch is peeling or leaking | Poor adhesion or material fatigue | Remove the old patch completely, clean and prep the area thoroughly, then apply a new, larger patch. |
| Long tear right along a seam | Structural bond failure | This is a serious problem. A DIY patch is very unlikely to hold under pressure; this repair needs a professional. |
Taking a few minutes to diagnose the issue correctly will save you time, materials, and ensure your repair holds up when you need it most.
Anyone who’s been around inflatable boats for a while knows a good, strong patch is 90% preparation and only 10% application. If you rush the prep work, you’re just setting yourself up for a repair that’s guaranteed to fail—and probably at the worst possible time.
This is your hands-on guide to getting a permanent, airtight seal that brings your boat back to life, whether you're working with PVC or Hypalon.
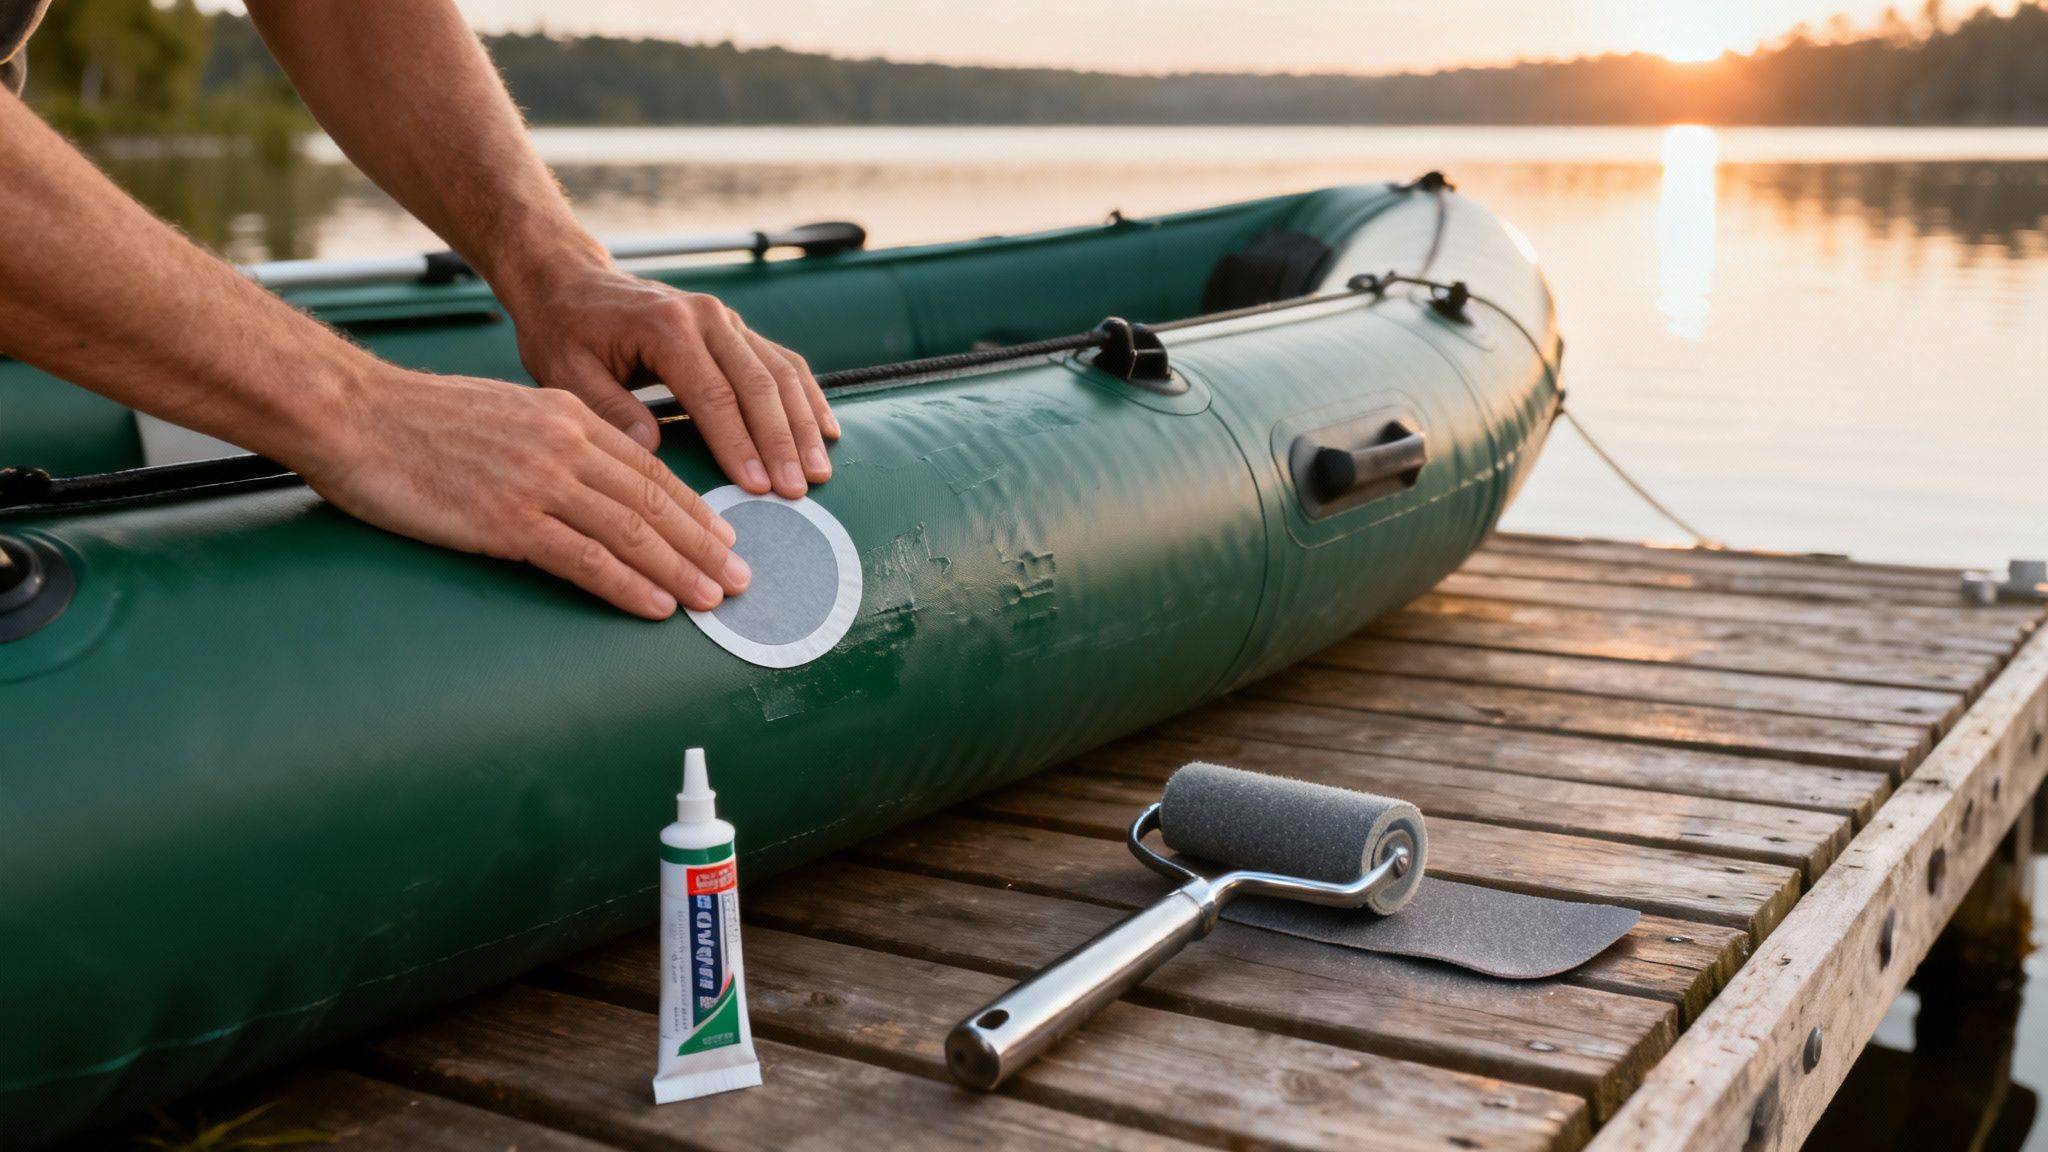
It all starts with the patch itself, not the glue. You’ll want to cut a piece of material that extends at least five centimetres beyond the tear or hole on all sides. Just as important, round off the corners. Sharp, square corners are a weak point just waiting to get caught on something and start peeling up.
This infographic gives you a quick rundown of how to find common leaks, from failing seams to old patches that have given up.
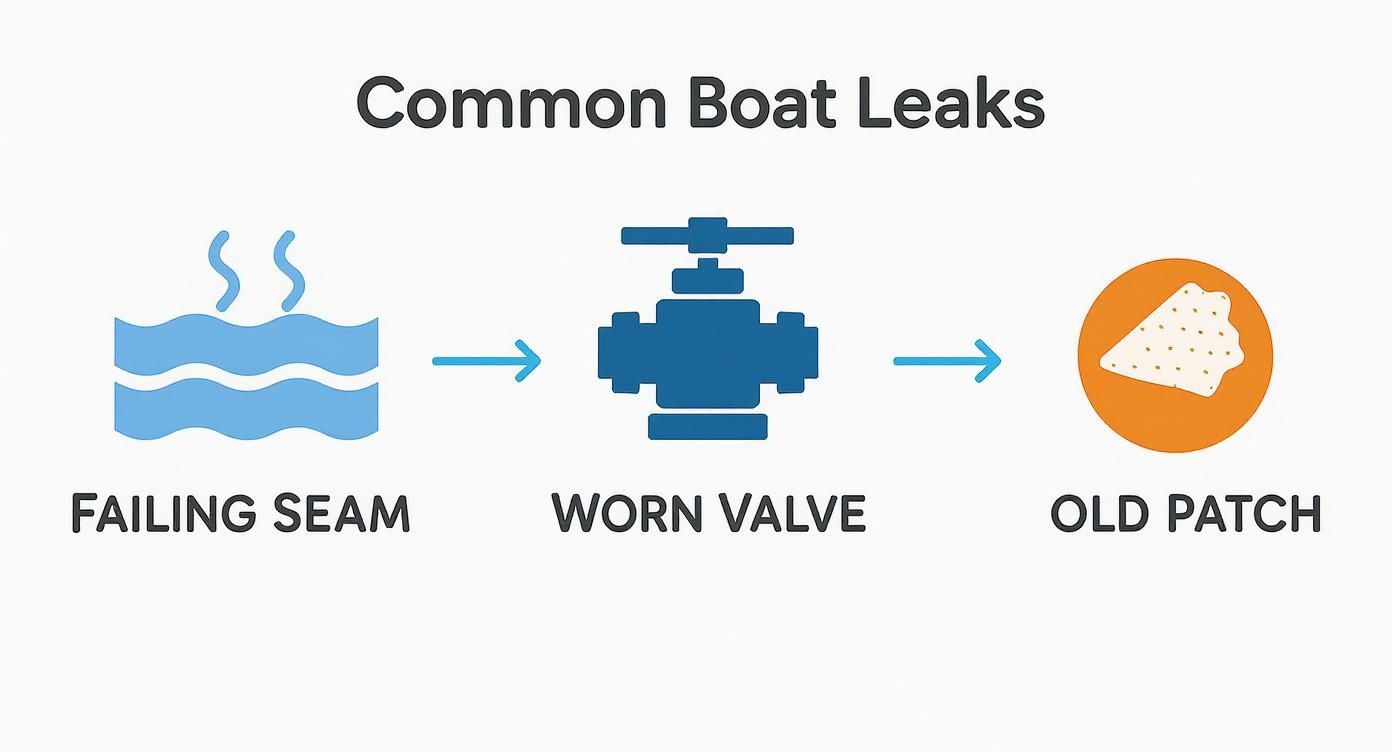
As you can see, figuring out what's wrong is the first hurdle. A simple puncture needs a different game plan than a leaky seam or a worn-out valve.
Once your patch is cut and ready, the real work begins. You're aiming to create a solid "mechanical bond" by prepping both the patch and the boat.
Lightly scuff the underside of the patch and the area around the puncture with some fine-grit sandpaper. The goal here is to take off that shiny factory finish and create a slightly rough texture for the adhesive to really bite into.
Next comes the cleaning, and this step is absolutely non-negotiable for a lasting fix. Grab a clean, lint-free rag and wipe down both roughened surfaces with the right solvent—MEK for PVC boats or Toluene for Hypalon. This gets rid of every last trace of dirt, oil, and any silicone protectants that will stop a proper chemical bond from forming.
One of the most common mistakes is people skipping the solvent wipe, thinking the area looks clean enough. Even microscopic residue can ruin the adhesive's job, leaving you with a patch that looks fine but peels right off under a bit of pressure or heat.
With your surfaces perfectly prepped, it's glue time. Following the manufacturer’s instructions is critical here, as the process for one-part PVC glues can be different from two-part Hypalon adhesives.
The trick is to apply a thin, even layer. Piling on too much glue is just as bad as not using enough, because it stops the solvents from evaporating properly and weakens the bond.
Apply a thin coat to both the boat and the patch. Most adhesives need a specific "tack time," which is usually a 5-15 minute wait until the glue feels tacky but doesn't transfer when you touch it with your knuckle. Many professionals apply a second thin coat after the first one has tacked up.
When it's ready, carefully line up the patch over the puncture. Start from one edge and press it down firmly to make sure you don’t trap any air bubbles underneath. Use a seam roller or even the back of a spoon to apply firm, even pressure from the centre outwards, squeezing out any trapped air.
For a deeper dive into the specific tools and materials you'll need, our guide to rubber boat repair has some great extra tips.
Finally, you need a bit of patience. That patch has to cure properly, which takes a minimum of 24-48 hours in a dry, temperate spot. High humidity will slow this down significantly. If you want the absolute strongest bond possible, give it up to a week before you fully inflate the boat and get back on the water. It’s worth the wait.
They say the best inflatable boat repair is the one you never have to do. It’s absolutely true. While knowing how to patch a hole is a critical skill, spending a little bit of time on proactive care will save you a world of effort—and money—down the track.
Think of preventative maintenance as your first and best line of defence. It’s all about stopping common issues before they even get a chance to start.
If there's one thing you need to get right, it's maintaining the correct air pressure. This is arguably the most important part of looking after your boat.
An under-inflated boat is sluggish in the water, and worse, it puts a huge amount of stress on the seams and transom as it flexes. On the flip side, over-inflation is just as bad. On a hot Aussie day, the air inside expands, and that can strain the seams to their breaking point.
Your boat has a recommended PSI (pounds per square inch)—stick to it religiously. A quality pressure gauge isn't a 'nice-to-have'; it's a non-negotiable tool for every inflatable owner. And remember that air pressure changes with temperature. Always check it before you launch, and be ready to let a little air out if your boat is going to be sitting in the direct sun for hours.
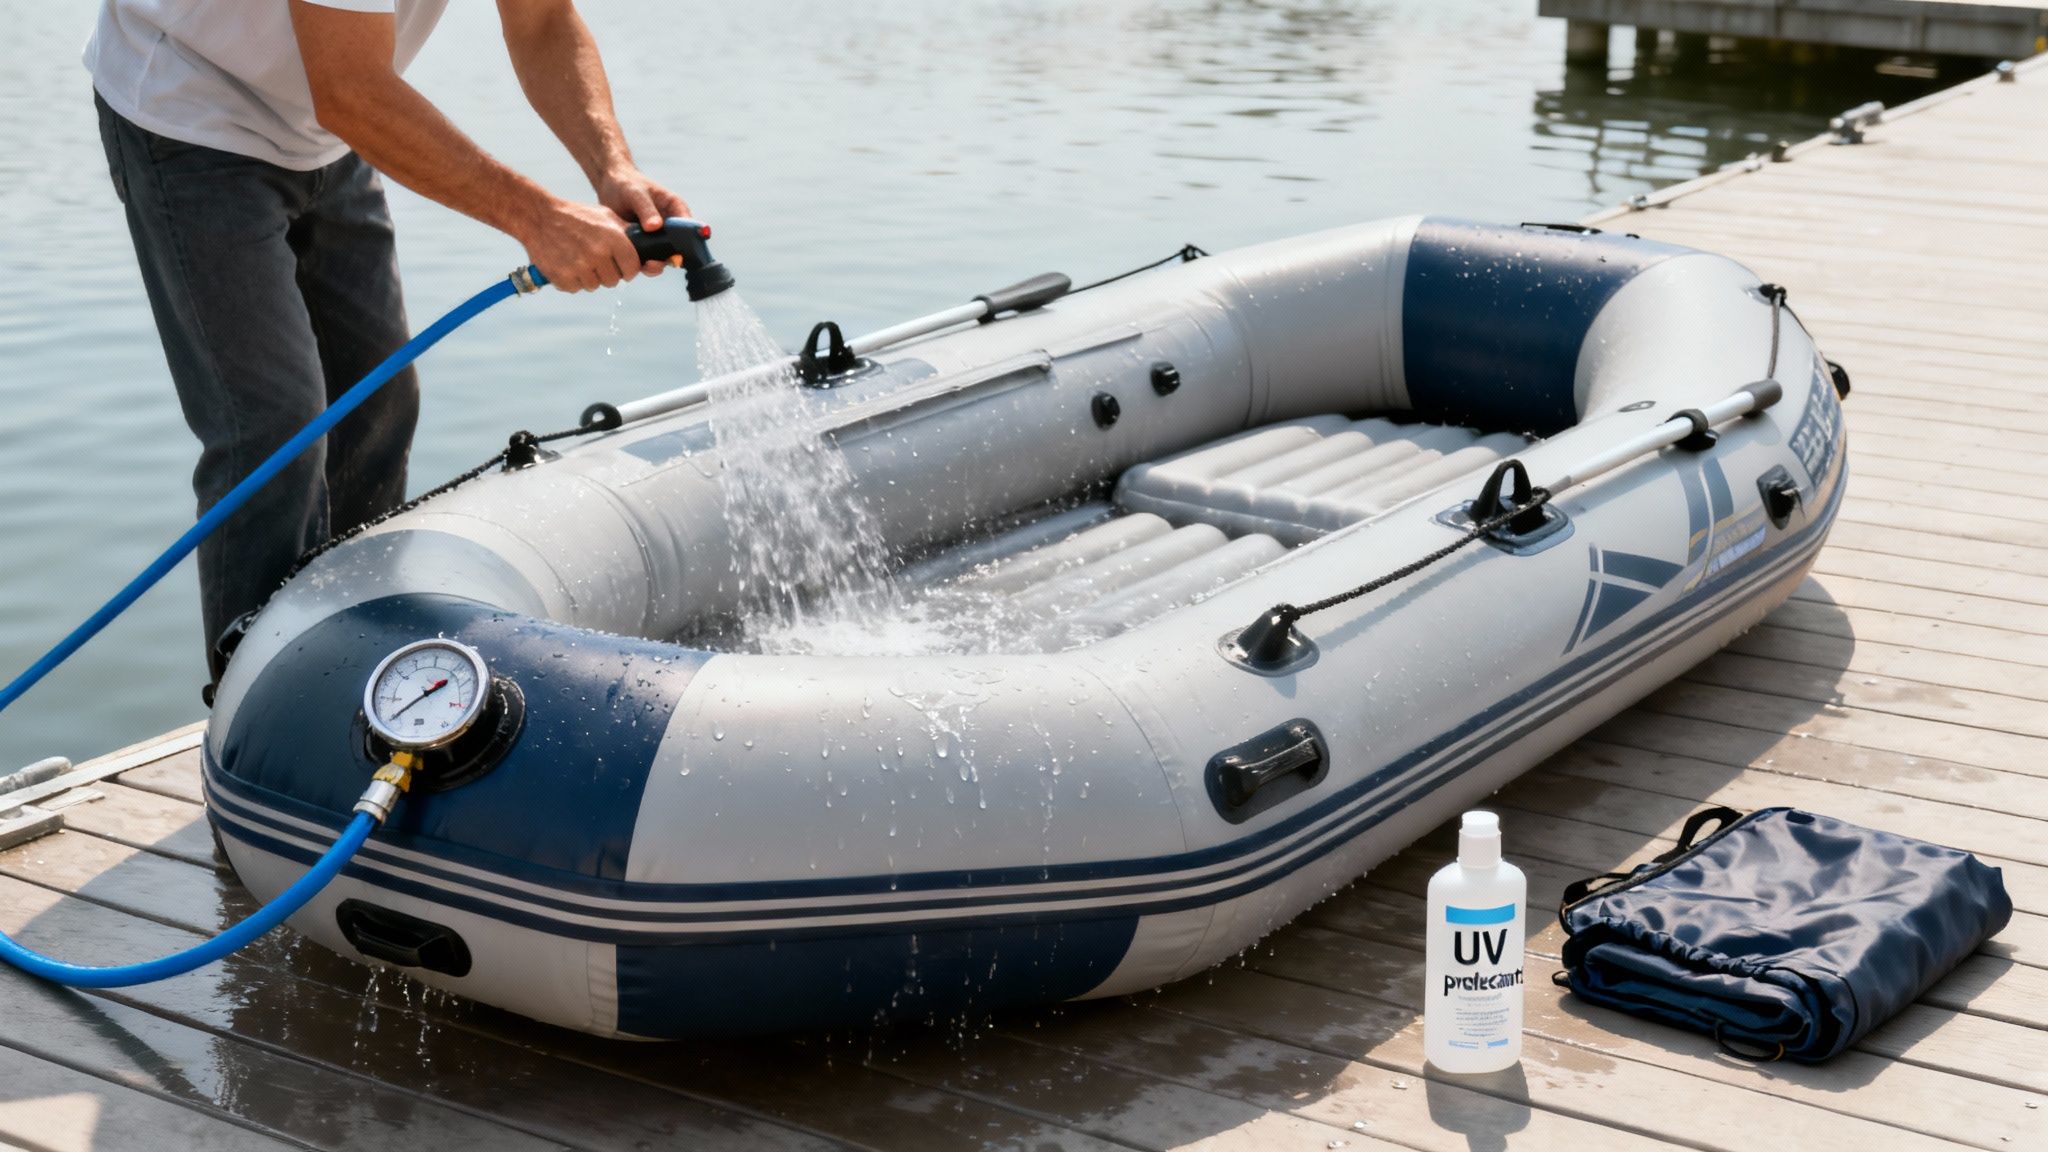
After a day out on the salt, the simplest and most effective thing you can do for your boat is give it a good, thorough rinse with fresh water. It sounds basic, but it makes a huge difference.
Salt crystals are incredibly abrasive and corrosive. When they're left to dry on the fabric, they slowly eat away at the material and can wreak havoc on metal fittings and valves over time. A quick but comprehensive rinse after every single use gets rid of these damaging deposits.
Pay extra attention to the valves, transom fittings, and right along the seams. These are the sneaky spots where salt loves to hide and cause hidden damage, which often leads to a frustrating hunt for a slow leak later on.
For the more stubborn grime that a simple rinse won't shift, always use a cleaner specifically designed for inflatable boat fabrics. Harsh chemicals like bleach or ammonia-based cleaners are a definite no-go. They can strip the material of its protective coatings, making it brittle and weak over time.
Here are a few safe and effective cleaning practices:
Applying a UV protectant 2-3 times per season is a small effort that will drastically extend the life of your boat's fabric. You can find more practical tips in our guide on making inflatable boat maintenance simple.
Finally, smart storage is the last piece of the puzzle. Whenever you put your boat away, make sure it's clean, completely dry, and preferably covered and out of direct sunlight. If you're storing it deflated, ensuring it’s bone dry is crucial to prevent mildew. You’ll also want to protect it from rodents, who have been known to chew through boat fabric for nesting material.
Knowing how to patch a simple puncture is a fantastic skill for any inflatable boat owner. It’s part of the ownership journey. But just as crucial is knowing your own limits and recognising when a problem has moved beyond a simple DIY job.
Trying to tackle a serious structural issue without the right gear and experience can quickly turn a repairable boat into a write-off. It’s a costly mistake to make.
If you spot any of the following issues, your best and safest move is to get a professional involved. These aren’t just cosmetic blemishes; they’re problems that can seriously compromise the safety and seaworthiness of your boat.
Please note: Easy Inflatables outsource all warranty repair work to local Inflatable Repair Specialists, we do not do Internal repair work. We specialise in sales, spare parts and accessories.
This ensures major repairs are handled by genuine experts. You can read more about how this works in the Easy Inflatables warranty process.
A professional repair workshop has equipment and materials that just aren't practical for a home garage. They can control critical factors like temperature and humidity, which dramatically affect how well modern adhesives cure and bond. That's how they guarantee the strongest possible repair.
The boatbuilding and repair industry in Australia is a big deal, which makes sense given our love for the water. This sector, which includes inflatable boat specialists, has grown into a $1.4 billion market. It just goes to show how much demand there is for high-quality, reliable repairs. You can learn more about the Australian boat repair market research to get a sense of how vital this service is to our boating culture.
Ultimately, calling in a professional for a major inflatable boat repair isn't giving up. It’s a smart decision. It protects your investment and, most importantly, keeps everyone you take out on the water safe.
When you're faced with a repair, a dozen questions can pop into your head. Getting the right answers from the start is the difference between a patch that lasts a season and one that fails on your next trip out.
Let's dive into some of the most common questions we hear from boat owners, so you can tackle your next repair with confidence.
This is the big one, and the answer is simple: the right glue depends entirely on your boat's fabric. Using the wrong adhesive is the number one reason patches fail, so this is the one step you can't get wrong.
For PVC boats, you'll need a one-part polyurethane-based adhesive. If you have a Hypalon boat, you must use a more robust, two-part chloroprene-based adhesive. There’s no wiggle room here—it’s one or the other.
Not sure what your boat is made of? No problem. Just do a quick solvent test on a hidden spot, like under a seat patch or inside the transom. Dab a tiny bit of MEK (methyl ethyl ketone) on the fabric with a cloth. If it gets tacky and a little sticky, you've got a PVC boat. If the solvent just dulls the finish without any stickiness, it's Hypalon.
Patience is your best friend here. Rushing the curing process is a guaranteed way to end up with a leaky patch. That chemical bond needs uninterrupted time to work its magic and reach full strength.
Most adhesive manufacturers will tell you to wait at least 24 to 48 hours before inflating the boat fully or putting any stress on the repair. But that's just a baseline—the real world has other plans.
High humidity is the enemy of a fast cure. If you're working in a damp or humid environment, that 48-hour window might need to be stretched out quite a bit for the glue to properly set.
For the absolute best result, especially when using a two-part glue on a Hypalon boat, giving it up to seven days is the gold standard. When in doubt, always follow the specific instructions on the adhesive tin—the manufacturer knows best.
This question comes up a lot, and the honest answer is: it really depends on how bad the leak is.
If you've found a tiny pinhole leak right on a seam, you can often sort it out yourself. A specialised liquid seam sealant can work wonders, or you can apply a well-prepped, oversized patch that covers the area completely.
However, if you can see the seam peeling apart, separating, or there's a long tear along the join, that’s your cue to stop. Put the tools down and call a professional. A separating seam means the original factory bond has failed, and that's a structural issue. Trying to DIY a fix on that kind of damage usually makes things worse, leading to a much more complicated and expensive professional repair later on. The experts have the right tools and climate-controlled workshops to re-bond an entire seam properly, ensuring it's safe and built to last.
At Easy Inflatables, we specialise in providing top-quality inflatable boats, spare parts, and all the accessories you need for your adventures on the water. While we outsource major warranty work to local specialists, we are your go-to source for everything else. Explore our range of boats and gear today.
Find your next inflatable boat at https://easyinflatables.com.au.