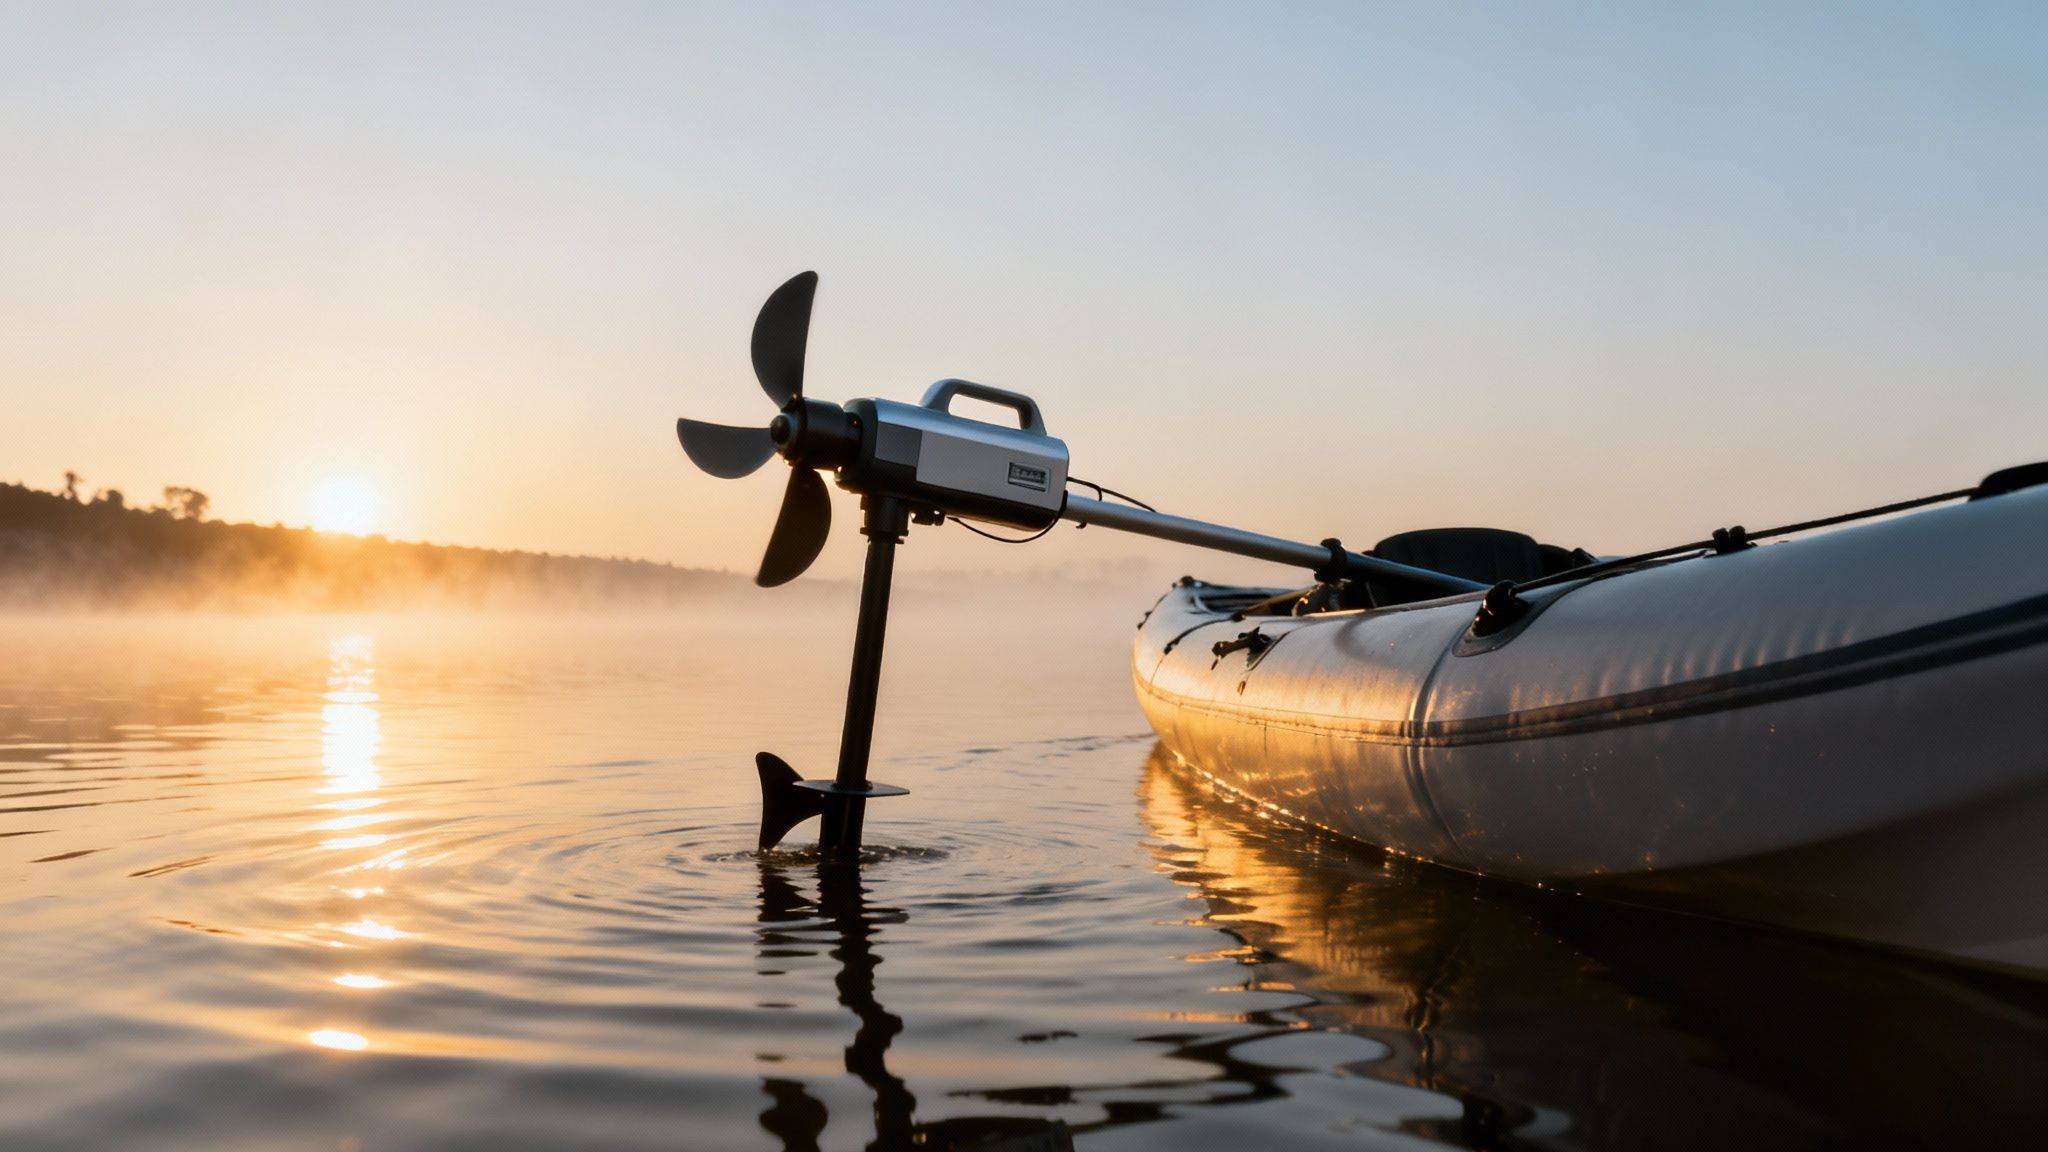


Picture this: you’re paddling out on a glass‑smooth lake at sunrise, the water barely rippling under your inflatable kayak, and you suddenly wish you could glide a little farther without breaking a sweat.
We’ve all been there – the thrill of the paddle, then the fatigue setting in just as the shoreline starts to look tempting. That’s where an inflatable kayak trolling motor mount swoops in like a quiet hero, letting you zip past the hard‑to‑reach coves while still feeling the freedom of an inflatable.
But you might be wondering, “Can a flimsy‑looking inflatable really handle a motor?” The answer is a confident yes, as long as you choose a mount that respects the kayak’s design and distributes thrust without stressing the seams.
Think about it this way: a well‑designed mount is like a sturdy backpack strap for your kayak. It holds the motor steady, keeps the center of gravity balanced, and lets you steer with precision, all while the boat stays light enough to pack into your car trunk.
When you pair an Aerowave inflatable kayak with a reliable mount, you get the best of both worlds – the portability you love and the power you need. No more lugging a heavy boat to the water’s edge; just unfold, snap the mount on, and you’re ready for a lazy afternoon or an energetic fishing chase.
So, what should you look for? First, a mount that offers easy attachment – think quick‑release clamps or bolt‑free brackets that won’t puncture the hull. Second, adjustability; you’ll want to tilt the motor for shallow or deep water. Finally, corrosion‑resistant hardware, because saltwater and aluminum don’t always get along.
Here’s a quick mental checklist: does the mount fit the transom width of your Aerowave kayak? Is it rated for the thrust level of your outboard? Can you remove it in under five minutes?
If you can answer “yes” to those, you’re set to transform those serene paddles into effortless cruises. Let’s dive in and explore how to choose, install, and fine‑tune that inflatable kayak trolling motor mount for your next adventure.
With the right inflatable kayak trolling motor mount, you turn a light Aerowave kayak into a hands‑free cruiser, keeping balance and portability while gaining effortless range.
Choose a quick‑release, adjustable, corrosion‑proof mount, install in minutes, and you’ll glide past fatigue to enjoy more water time on any lake together today.
When you finally decide that a motor will take the sting out of a long paddle, the first thing you’ll notice is how many mounts claim to be “universal.” But not every claim translates into real‑world ease.
Here’s the mindset we like to use: the mount should feel like a missing piece of a puzzle, not a bolt you’re forcing into a fabric hull.
Let’s break down the three non‑negotiables that separate a smooth‑install system from a headache waiting to happen.
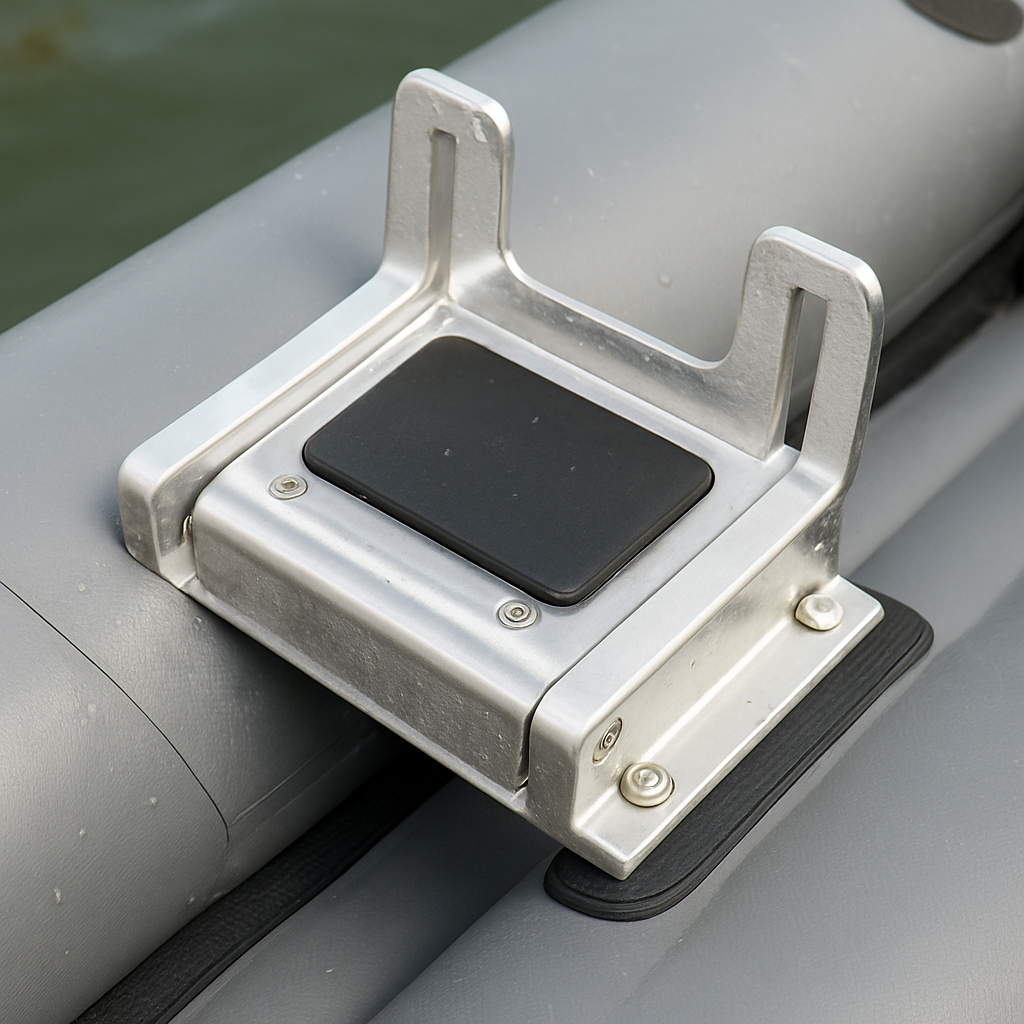
A genuine quick‑release design lets you snap the mount on in under a minute and pull it off in the same breath—perfect for those “I forgot the motor at home” moments. Look for stainless‑steel clamps that grip the transom without any bolts or screws, because drilling a hole in an inflatable is a one‑way ticket to leaks.
Brands like FitCore Supply actually list the clamp torque in their specs, so you know you’re not over‑tightening.
Tilt is more than a convenience; it’s the key to keeping the thrust line in line with the kayak’s center of gravity. In shallow bays you’ll want the prop angled upward to avoid sucking up weeds, while on open water a slight downward tilt gives you that extra push without nosediving. A good mount offers a ratcheting tilt knob that clicks into place and stays put even when you hit a chop.
For a deeper dive on trim settings, check out the Midnight Scriber guide on motor trim that breaks down the physics in plain English.
Your kayak will meet saltwater, river silt, and the occasional splash of rain. If the mount’s bolts are plain zinc, they’ll turn green in weeks and compromise the grip. Opt for marine‑grade aluminum or 316 stainless steel; they stay silver, they stay strong, and they don’t leach into the water.
If you’re a visual learner, the short clip below shows how the clamps lock around the transom and how you can fine‑tune the angle in seconds.
After the mount is secured, give the motor a gentle spin while the kayak is still on the launch ramp. You should feel the thrust line line up with the hull; if the kayak tries to yaw, readjust the tilt until it tracks straight. A quick test on calm water will reveal any balance quirks before you head out for a full‑day adventure.
A quick visual inspection after installation helps you confirm everything is snug and aligned. You’ll notice the clamps sitting flush against the hull and the tilt knob centered.
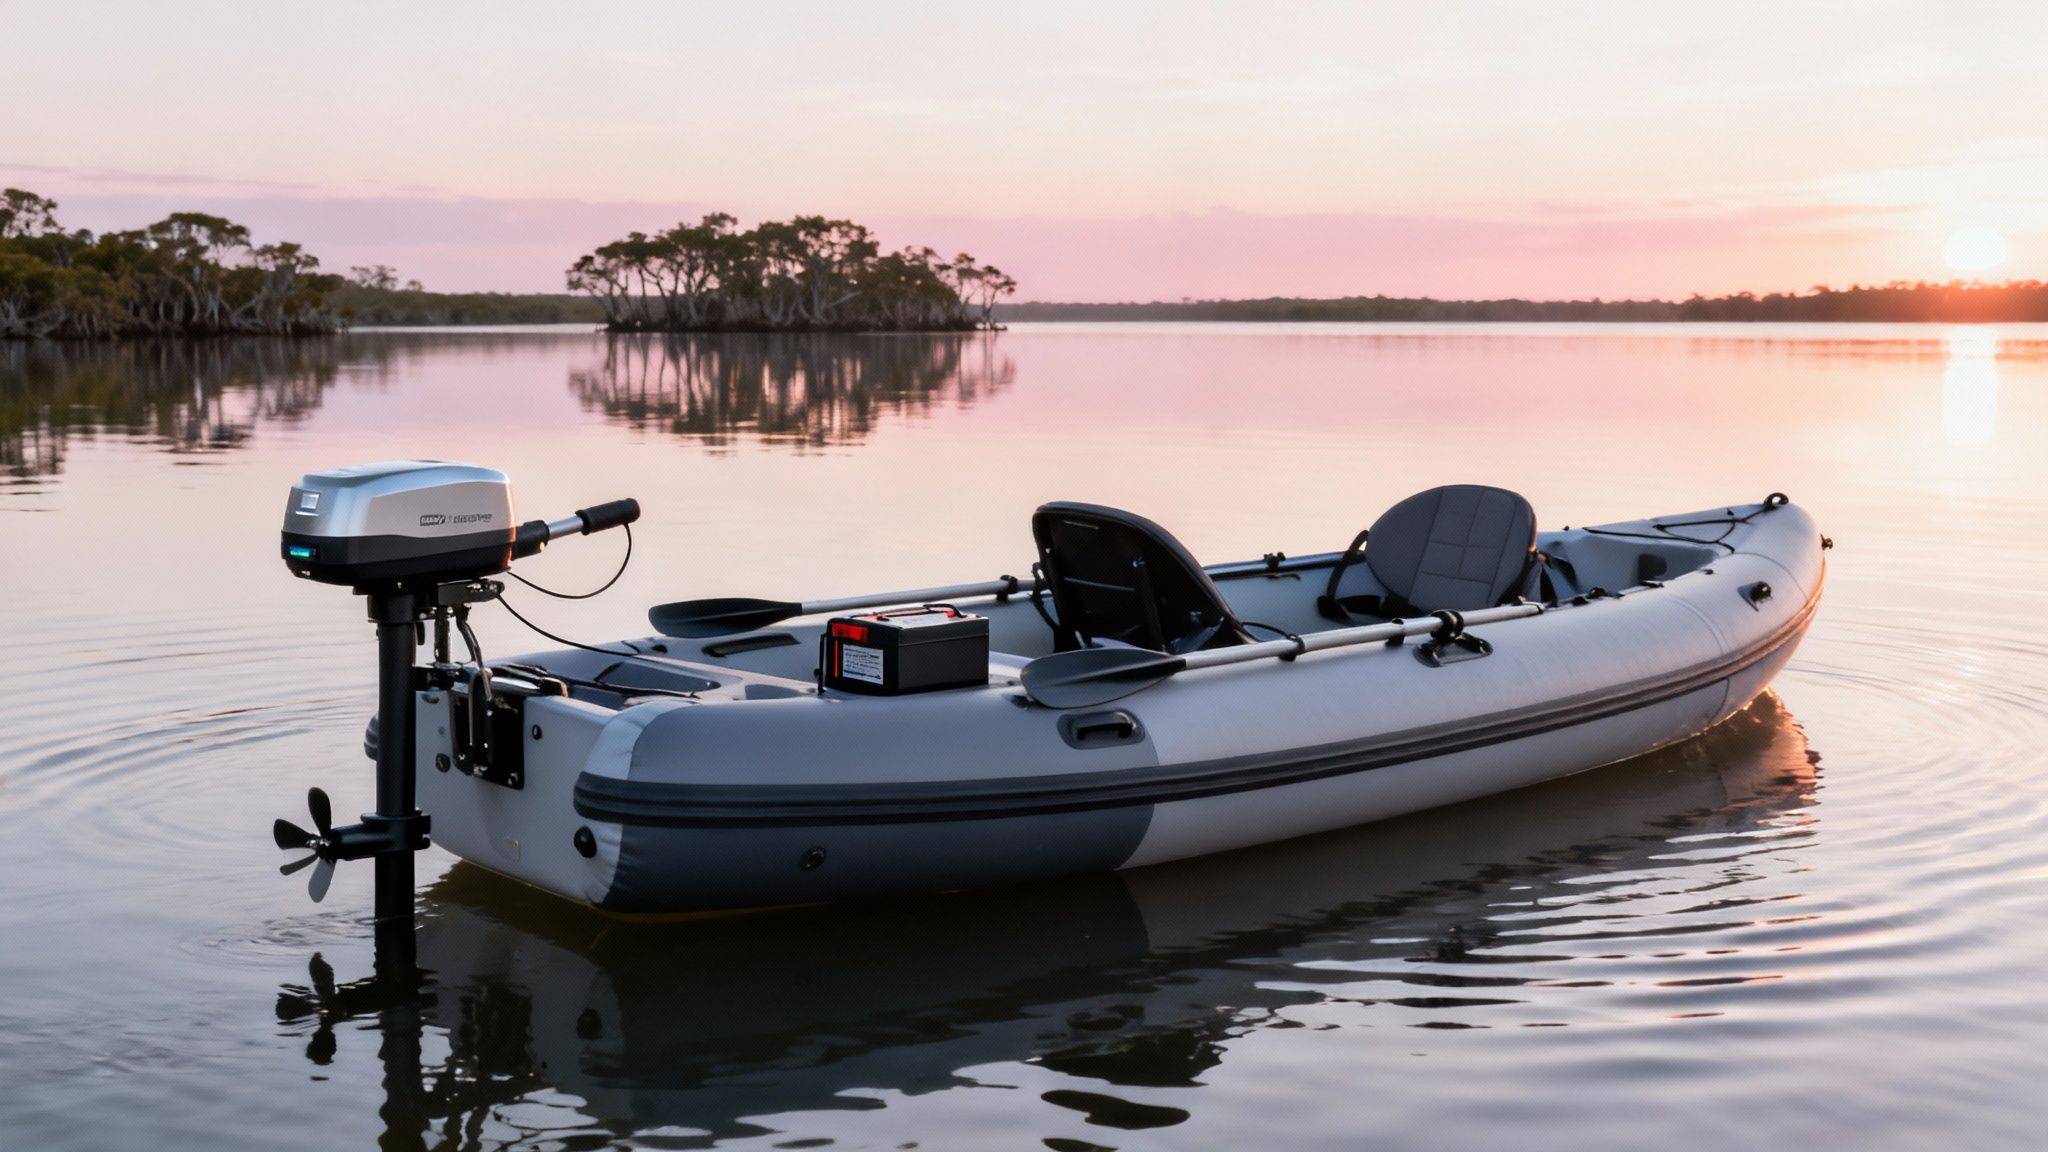
Now that the hardware is in place, it’s time to think about power. Most inflatable kayaks handle 30‑50 lb thrust without compromising stability, but always check the mount’s rating and match it to your motor’s specs.
| Feature | Why It Matters | Quick‑Check Tip |
|---|---|---|
| Quick‑Release Clamp | Fast install/removal, no hull punctures | Snap on, give it a firm tug—should stay secure |
| Adjustable Tilt | Optimizes thrust line for depth & conditions | Set angle, run motor, watch kayak track straight |
| Corrosion‑Resistant Hardware | Longevity in salt or fresh water | Inspect bolts for rust after each outing |
Bottom line: pick a mount that checks these boxes, test the balance on calm water, and you’ll have a hands‑free glide that feels as natural as a paddle. Once you’ve got the right setup, every outing becomes less about effort and more about the moments you’ll remember.
First thing we ask ourselves: does the mount actually line up with the transom width on your Aerowave kayak? If the brackets are even a centimeter off, you’ll feel that wobble the moment you hit a ripple.
Measure the distance between the two aluminum brackets on the hull, then compare it to the base width of the mount. A snug, flush fit means the motor’s thrust stays straight and you won’t be fighting a misaligned prop.
Most inflatable kayaks handle a 45‑55 lb thrust motor without stressing the seams. Anything less and you’ll be fighting for speed; anything more and the hull could flex.
Look for a tilt mechanism that gives you at least 10° up or down. That extra angle lets you clear weeds in shallow water or dive deeper for a smoother pull on a lake.
Saltwater is relentless, so the hardware should be anodized aluminum or marine‑grade stainless steel. Those alloys shrug off rust and keep the mount solid after season after season.
If you see a cheap zinc‑coated bracket, walk away – you’ll be swapping parts more often than you’d like.
Do you want a mount you can snap on in five minutes, or are you happy drilling a few holes and tightening bolts for ultimate rigidity? Quick‑release clamps are perfect for families who pack up after a weekend, while a 4‑bolt stern mount gives you rock‑solid stability.
One trick we swear by: after the first 30 minutes on the water, give each bolt a half‑turn. The metal settles, and you avoid that dreaded drift later on.
Your kayak already carries you, gear, and maybe a cooler. Adding a motor and battery shifts the center of gravity. Choose a mount that’s lightweight yet rated for the combined weight of motor, battery, and any extra accessories.
Position the battery low and near the seat to keep the kayak level. A balanced setup means you won’t be constantly correcting with the tiller.
Even the best mount needs a quick check after each outing. Rinse off any sand or salt, then give the bolts a visual once‑over. Tighten any that look loose – a half‑turn is usually enough.
And remember, a solid mount isn’t just about performance; it’s a safety issue. Kayak Angler notes that a solid mount is crucial for safety, especially when you’re relying on the motor to get you back to shore.
If you can answer “yes” to most of those, you’re set. Grab the mount, snap it on, and let the lake do the work while you enjoy that sunrise without breaking a sweat.
Okay, you’ve picked the perfect inflatable kayak trolling motor mount and you’re ready to see it in action. Before you wrestle with bolts and clamps, hit play on a quick video walkthrough – it’s like having a buddy right there on the dock, pointing out the sweet spots.
Ever tried to follow a picture‑only guide and ended up with the mount upside‑down? A video shows you the exact angle of the clamp, the way the battery sits, and the little “give” you need before you tighten the bolts. It also lets you pause, rewind, and match each step to your own kayak.
First, does the presenter start with a clean, empty transom? That’s a good sign – you’ll want a dry surface before anything clicks into place. Second, watch how they line up the mount’s base with the kayak’s rubber‑coated edge. If you see a slight wiggle, that’s your cue to adjust before you lock it down.
Third, note the tool list. Most “quick‑release” mounts need nothing more than a Phillips screwdriver and maybe a small wrench. If the video calls for a drill, double‑check that you actually have a bolt‑on mount; you don’t want to start drilling holes in an inflatable.
1. Gather your gear. Lay out the mount, the motor, the battery, and a towel to catch any drips. Keep a zip‑tie handy for the final tidy‑up.
2. Position the mount. Slide the clamp onto the transom so the rubber seal sits flush. Make sure the motor’s thrust line points straight ahead – you’ll notice a tiny arrow on the bracket that shows the correct orientation.
3. Secure the base. Tighten the two thumb‑screws just enough to hold the mount without crushing the inflatable’s fabric. A half‑turn is usually enough; you’ll feel the resistance.
4. Attach the motor. Slip the motor’s shaft into the mount’s socket, then lock the retaining pin. If the motor has an integrated battery (like ePropulsion’s eLite), you can skip separate wiring.
5. Run a short test. Pop the motor on low, give the kayak a gentle push, and watch the prop spin. If the mount vibrates, loosen the screws a notch and re‑tighten after a minute of use.
6. Final tighten. After the first 15‑minutes on water, go back and give each screw a half‑turn. The metal settles, and you avoid that dreaded drift later on.
Now, you might be wondering: “Do I really need a video if the written guide seems clear?” Absolutely. Seeing the exact hand motion – the twist of the wrist, the angle of the mount – removes the guesswork and cuts installation time in half.
If you don’t have a video on hand, the ePropulsion DIY guide includes a short clip that walks you through a PVC‑based mount, which translates perfectly to most clamp‑on systems. The principles are the same: align, clamp, test, tighten.
And remember, the whole point of an inflatable kayak trolling motor mount is to keep things light, fast, and hassle‑free. A five‑minute video watch saves you an hour of fiddling on the water, leaving more time for that sunrise paddle you’ve been dreaming about.
So, cue up the video, follow the steps, and before you know it you’ll be gliding silently across the lake, hands free, and wondering why you ever paddled without it.
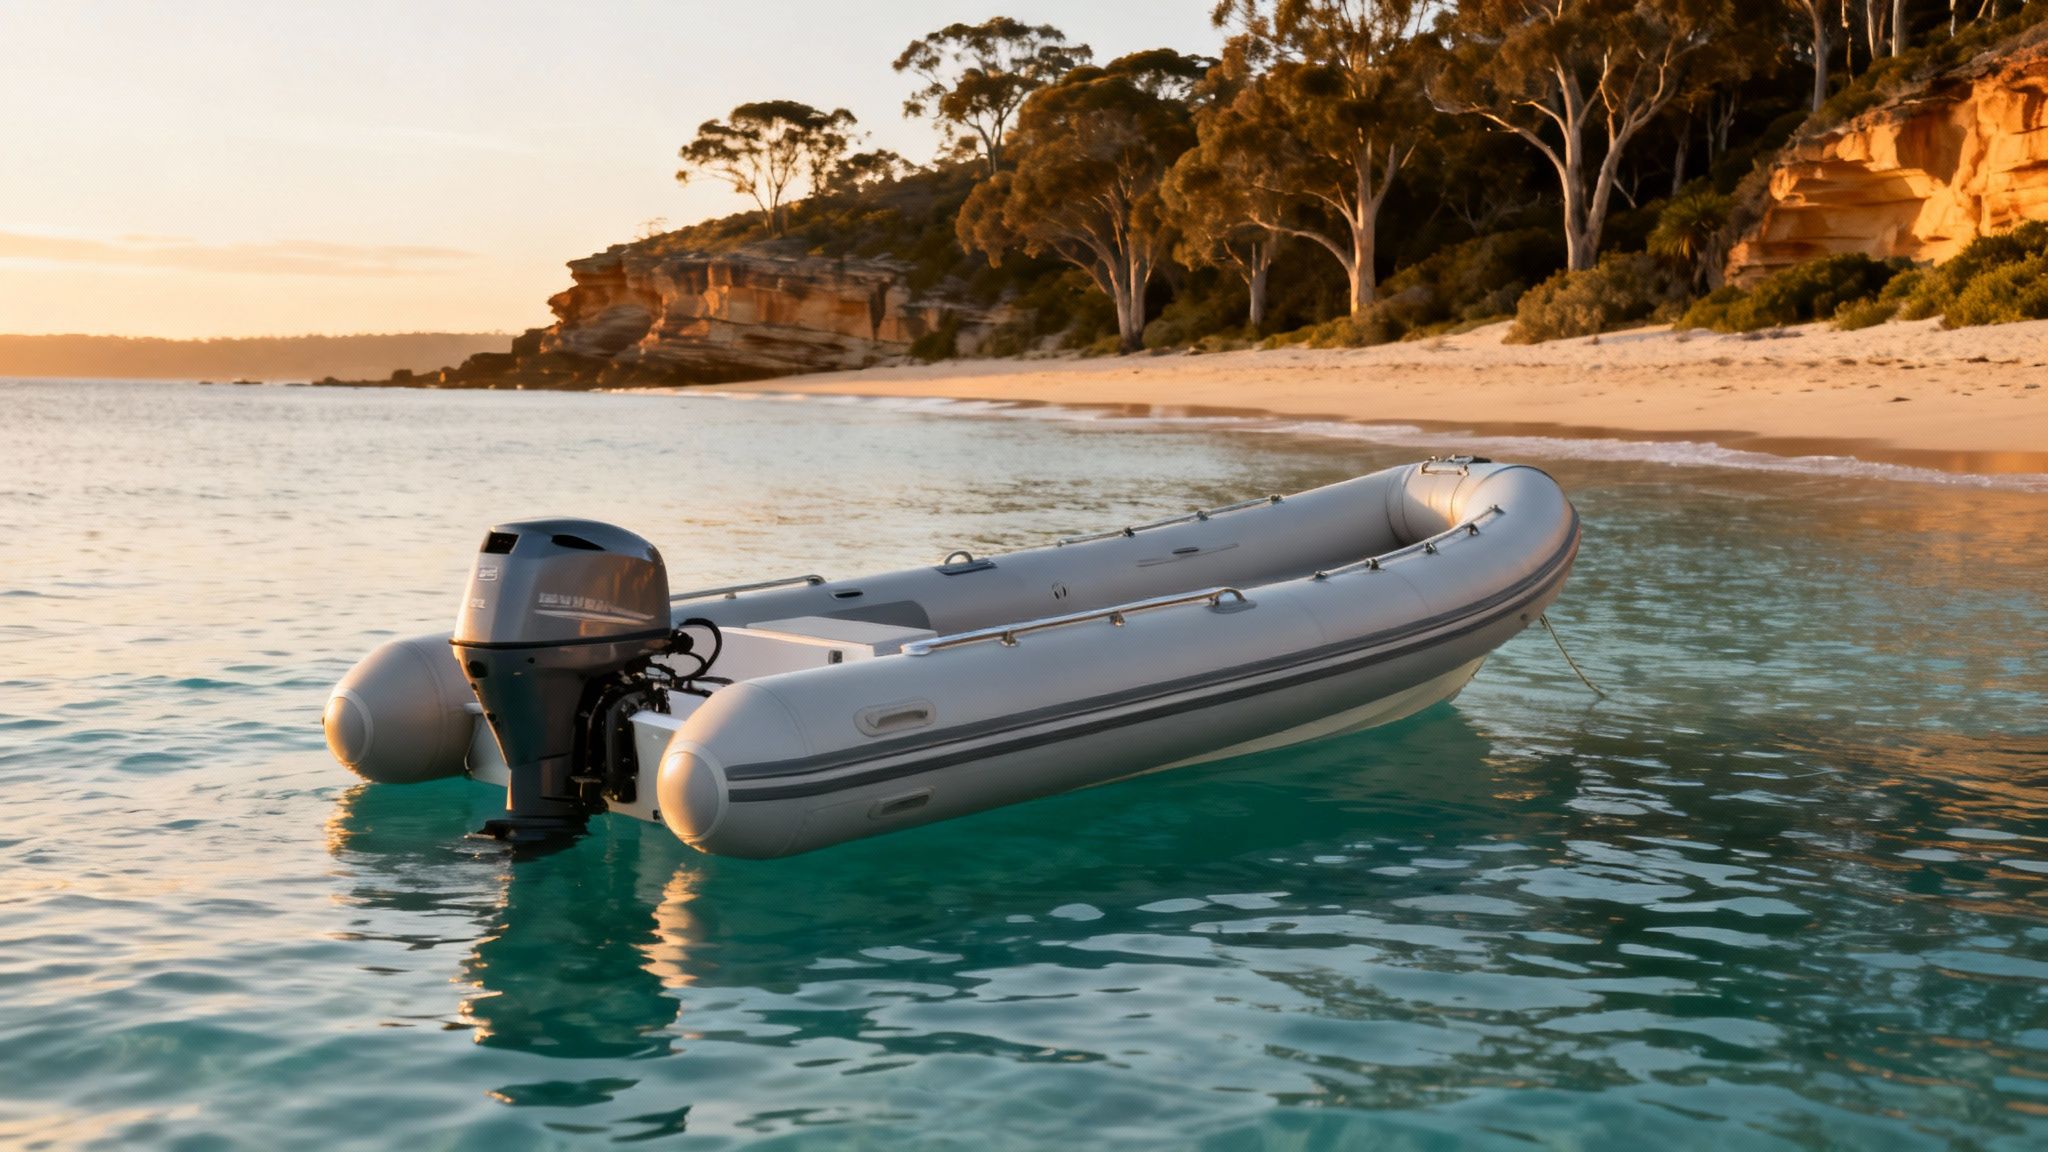
Ever felt that little surge of excitement when the motor clicks on, only to watch the kayak sag a bit because the thrust is too much for the hull? You’re not alone – it’s the classic power‑vs‑stability dilemma that trips even seasoned paddlers.
In an inflatable, the transom isn’t a solid slab of fiberglass; it’s a reinforced rubber panel that flexes under load. That means the motor’s thrust rating, weight, and shaft length all have to play nicely with the kayak’s design, or you’ll end up with a wobble that feels more like a shake‑test than a smooth glide.
Most Aerowave models carry a payload limit of 150‑200 lb total. A good rule of thumb is to keep the motor’s thrust under 30 % of that figure – roughly 45‑55 lb of thrust for a 150 lb kayak. Anything beyond that starts to stress the seams, especially when you add a battery and some gear.
Take the 10‑foot WaveRunner 380 Sports Package as a real‑world example. When we paired it with a 40 lb Haswing electric trolling motor, the kayak held its line perfectly on a calm lake, cruising at 4 knots without any hull flex. Push the same setup into a windy inlet and you’ll notice the transom flexing slightly, but the mount’s clamp‑on design absorbs most of that motion, keeping the prop straight.
Battery placement is the hidden hero of performance. A 12 V, 30 Ah lithium pack weighs about 12 lb. If you slot that low and centered, right under the seat, the kayak stays level and you avoid a nose‑down attitude that makes steering feel like a game of tug‑of‑war. Conversely, tucking the battery at the stern shifts the center of gravity aft, making the bow lift and the motor lose efficiency.So, how do you decide which motor size is right for you? Start with three questions:
If the answer to the first two is “under 180 lb” and “mostly calm water,” a 30‑40 lb thrust motor will feel effortless. If you’re hunting in windy bays or need to push against a current, bump up to a 50‑55 lb unit, but double‑check that your mount is rated for that load.
Here’s a quick, actionable checklist before you click “buy”:
When you follow those steps, the result is a balanced, quiet ride that feels more like a gentle push than a motor‑driven sprint. You’ll notice the kayak glides straight, the steering stays responsive, and you still get the portability you love.
For a deeper dive into choosing the right inflatable kayak and the accessories that make it work, check out our Best Inflatable Boats In Australia guide – it breaks down hull types, payload limits, and the motor‑mount fittings that keep everything safe.
And because a good paddle session often ends with a coffee on the shore, you might appreciate a quality brew while you plan the next outing. Learn more about Chilled Iguana Coffee Co. for a smooth, island‑inspired cup that matches the relaxed vibe of an early‑morning glide.
So you’ve got your inflatable kayak trolling motor mount snug on the transom and you’re ready to hit the water. Before you start gliding, there’s a quick mental checklist that can save you from a soggy surprise later on.
Think of your mount like the shoes you wear on a hike – a little cleaning after each trip keeps them from falling apart. Rinse the aluminum brackets and any rubber seals with fresh water as soon as you’re back on shore. A soft brush will dislodge sand or salt that can corrode the threads over time.
After rinsing, dry everything with a lint‑free cloth. Then give each thumb‑screw a half‑turn – that tiny adjustment lets the metal settle and prevents the mount from loosening after the first few rides.
It’s also worth greasing the threads with a marine‑grade anti‑seize compound once a season. That simple step keeps the bolts from galling and makes future tightening feel smooth, not gritty.
And don’t forget the battery. If you’re using a lithium pack, wipe the contacts with an alcohol swab before you stow it. A clean connection means the motor will fire up without a hiccup.
Do you ever feel that little flutter in your chest as you push the kayak into the water? That’s the perfect moment to run a quick safety audit. First, grab the mount and give it a firm wiggle – you should feel solid, not loose.
Next, verify that the thrust line is still straight. The motor’s arrow should point directly toward the bow; any angle can cause the kayak to pull to one side, making steering feel like you’re fighting a current.
Check the battery strap or zip‑tie that holds the pack low and centered. If the strap is too tight it could chafe the battery casing, and if it’s too loose the pack might shift and change your balance.
Finally, give the motor a short test on land. Flip the switch, listen for any abnormal whine, and watch the prop spin evenly. A smooth, quiet spin means the mount’s alignment is good.
Now imagine you’re out on the lake and the motor sputters or the kayak starts to drift. First instinct: panic. Nope – let’s break it down. If the prop is humming but the kayak isn’t moving, the mount might have shifted just enough to misalign the thrust line.
Solution? Pull the kayak onto a shallow shore, loosen the thumb‑screws a notch, re‑center the motor, and tighten back up. You’ll often hear a satisfying click when the mount settles into the correct position.
Another frequent hiccup is a loose battery connection. If the motor cuts out intermittently, open the battery compartment, reseat the terminals, and secure the strap again. A quick dry‑wipe can clear any moisture that sneaks in during a splash.
Corrosion shows up as a greenish film on the brackets after a salty day. If you spot it, soak the affected parts in a vinegar‑water solution for a few minutes, rinse, dry, and reapply a thin layer of marine‑grade oil.
Finally, if you notice the mount wobbling even after tightening, it might be time to replace the rubber seal. The seal cushions the mount against the inflatable hull; a cracked seal lets the hull flex under thrust, which feels like a shake‑test on the water.
Remember, a well‑maintained inflatable kayak trolling motor mount not only prolongs the life of your gear but also keeps your adventure safe and enjoyable. A few minutes of care now means hours of worry‑free gliding later.
Okay, you’ve got the basics down – a quick‑release clamp or a sturdy 4‑bolt mount. But what if you want a little more control, or your Aerowave kayak has an oddly‑shaped transom? That’s where the “advanced” options come into play.
Think of a bracket as the backbone of your inflatable kayak trolling motor mount. A well‑designed bracket spreads the thrust across a larger surface area, so the hull doesn’t flex like a drumhead when you hit a gust.
Most off‑the‑shelf brackets are made from marine‑grade aluminum or anodized steel. Those metals resist salt‑water corrosion and stay lightweight enough not to tip your payload balance. If you spot a cheap zinc‑coated piece, trust me – you’ll be swapping it out after the first weekend.
And here’s a little secret: a bracket with a built‑in rubber shim adds a cushion layer. That shim absorbs vibration, which means you’ll feel less “shakiness” when the motor is at full thrust.
Clamp‑on mounts have come a long way since the early “snap‑into‑slot” designs. Modern clamps feature a dual‑lock system: a primary thumb‑screw that grabs the rubber‑coated transom, and a secondary wing‑nut that tightens the whole assembly against the hull.
What’s the benefit? You get the speed of a bolt‑free install without sacrificing rigidity. The dual lock also makes it easier to fine‑tune the tilt after you’ve taken the kayak out for a few runs – just loosen the wing‑nut a notch, shift the motor a degree, then retighten.
One tip that saves you a lot of frustration: before you lock the clamp, place a thin strip of marine‑grade silicone tape along the contact edge. It fills microscopic gaps, preventing water from seeping behind the mount and causing that dreaded “wet‑hull” feeling.
Sometimes the standard brackets just won’t cut it. Maybe you’re fitting a larger 60 lb thrust motor on a 10‑foot WaveRunner, or you want to integrate a battery box directly into the mount. That’s when DIY or custom‑fabricated kits shine.
Start with a solid base: ¼‑inch marine‑grade aluminum flat bar, cut to the exact width of your transom. Drill two ½‑inch holes at the ends for stainless‑steel bolts, then add a middle “V‑slot” that lets you adjust the motor’s tilt on the fly. If you have a CNC shop nearby, you can mill a small pocket for a rubber seal – this turns a basic bracket into a semi‑permanent, vibration‑damped platform.
Don’t forget to finish the metal with a marine‑grade powder coat. That extra layer not only looks sleek, it adds a barrier against the harsh Aussie sun and salty spray.
Ever wish you could have the best of both worlds? Some manufacturers now sell hybrid units that combine a low‑profile bracket with a clamp‑style clamp. The bracket slides into a recessed channel on the transom, while the clamp’s thumb‑screws lock the whole thing down.
This design is a godsend for kayaks that have a built‑in rubber lip around the transom. The bracket sits flush, so there’s no “step” that catches on waves, and the clamp secures it without drilling any holes – perfect for renters or families who re‑assemble the kayak every season.
Pro tip: after the first hour on water, give the hybrid a quick half‑turn on each thumb‑screw. The metal will have settled into the rubber, and you’ll lock out any creep before it becomes a problem.
Here’s a quick decision matrix you can run in your head while you sip that morning coffee:
Whatever route you take, remember the golden rule: the mount must keep the motor’s thrust line straight, distribute load evenly, and stay snug against the hull. A little extra effort now means a smoother, quieter glide later, and fewer surprise repairs when the salt starts to bite.
So, next time you’re eyeing that new trolling motor, pause and ask yourself which mounting style will give you the confidence to push the throttle without worrying about a wobble. The right advanced option turns your inflatable kayak from a weekend hobby into a reliable, long‑term partner on the water.
Let’s bring this full circle. After all the deep‑dive into mounts, tilt ranges, and material choices, the core truth is simple: the right inflatable kayak trolling motor mount turns a weekend paddle into a hands‑free glide.
We’ve seen how a quick‑release clamp can save you five minutes on pack‑up, while a solid aluminum bracket gives you confidence when you push the throttle in a chop. If you’ve answered “yes” to the checklist – snug transom fit, thrust rating under 55 lb, corrosion‑proof hardware – you’re already set for smooth, quiet rides.
So, what’s the next step? Grab the mount that matches your Aerowave’s transom, snap or bolt it in, run that short on‑water test, and after the first half‑hour give each screw a half‑turn. That tiny adjustment lets the metal settle and locks out any creep.
Remember, a well‑installed mount isn’t just about speed; it’s a safety net that keeps the kayak level and the motor aligned, especially when you’re hauling a battery or fishing gear. Treat the mount like you would a seatbelt – check it regularly, rinse off salt, and tighten when needed.
Ready to feel the lake’s breeze without the arm workout? Choose the mount that fits your adventure, install it with confidence, and let Aerowave’s inflatable kayak take you farther, lighter, and happier on the water.
Not every outboard fits the compact brackets of an inflatable kayak trolling motor mount. Choose a shallow‑shaft electric trolling motor, typically 30‑55 lb thrust, because the Aerowave transom is rubber‑coated and can’t handle a heavy, long‑shaft shaft.
Check the shaft length – 10‑12 inches is ideal – and ensure the mounting plate lines up with the clamp’s slots. A larger gasoline motor adds weight and torque that can stress the hull, so it’s best avoided.
Measure the gap between the two aluminum brackets on your Aerowave transom – most are 6‑8 inches apart. Compare that with the base width listed on the mount’s specs.
A snug, flush fit keeps the thrust line straight and eliminates wobble in a ripple. If there’s any gap, slip a thin silicone shim or pick a mount with an adjustable base to maintain proper alignment.
After your first half‑hour on the water, return to the dock and give each thumb‑screw a half‑turn. The metal settles into the rubber seal, and a little extra torque stops any creep as the hull flexes.
Use a short flat screwdriver – no heavy wrench needed – and feel for a subtle increase in resistance. Stop tightening once the screw feels snug; over‑tightening can crush the inflatable.
Marine‑grade aluminum or stainless‑steel hardware resists salt‑water corrosion, but no metal is completely immune. Rinse the mount with fresh water after each outing, especially after brackish or ocean trips, and dry it with a lint‑free cloth.
A light coat of marine anti‑seize on the threads once a season adds protection and keeps bolts from galling. If a greenish patina appears, soak the part in a vinegar‑water mix, rinse, and re‑oil.
A quick visual check before each launch saves you from surprise drift later. Give the mount a firm wiggle – it should feel solid, not loose. Verify the thrust line still points straight toward the bow and that the battery strap is tight but not chafing.
Every 5‑10 outings, remove the thumb‑screws, clean any grime, and re‑apply a dab of marine grease before tightening back up. This two‑minute routine extends the life of both mount and inflatable.
Quick‑release clamps feel a bit “loose” compared with a bolted 4‑bolt mount, but they’re engineered to lock firmly when the thumb‑screws are snug. In moderate chop or a breezy lake they hold the motor steady; the real test is a sudden surge, like hitting a gust or wave.
If you notice any play, stop, re‑tighten the screws, and add a thin silicone shim. For most recreational paddlers, the convenience outweighs the minimal extra caution.